chesstrainer: Create and Test Yourself on Chess Lines
chesstrainer-package.RdThe main purpose of the chesstrainer package is to create sequences of moves (lines), save them, and then test yourself on these sequences by repeating the moves from memory. This is especially useful for training openings, but can also be used for creating chess puzzles or training tactics.
Starting the Trainer
To start the trainer, run play() from the console. When starting the trainer for the first time, a directory for storing settings, a cache directory, and a directory for storing sequences are created. A few example sequences also come with the package and you will receive a prompt whether to copy these sequences to the sequence directory. To familiarize yourself with the trainer, it would be good to do so. Finally, you will receive a prompt to enter a player name. Choose a name and press enter.
The trainer then starts in add mode (see the ‘Note’ section at the bottom if you receive an error that the graphics device does not support event handling; for Windows users, see also the ‘Note for Windows Users’ section). For now, click on the window showing the chess board and press <space> (i.e., the space bar), which will switch to the test mode (note: in this manual, key presses are indicated as: <key>). One of the existing sequences will then be chosen at random. The trainer may immediately prompt you to play a certain opening (via a comment at the top of the window), it may make some moves for you, or it may start at a later position during a game. Either way, you will then have to make the correct move based on the position. You do this by either left-clicking and dragging the piece to be played from its current position to the desired target square or by left-clicking on the piece to be moved and then left-clicking on the target square.
Sidenote: If the text on the bottom or other visual elements are cut off, you can use the <{> and <}> keys to decrease/increase the margin width.
The trainer will then make the next move, after which you will then again have to make the correct move. This will continue until the end of the sequence. If you do not know what the correct move is, the <h> key will provide a hint showing which piece to move. Pressing <h> for a second time will show the target square. Once the sequence has ended, left-clicking starts a new sequence.
In test mode, information is shown at the bottom about the current mode, the name of the current sequence, the player name, the current move number and the total number of moves of the sequence, the number of rounds (how many times the sequence has been played so far), the age of the sequence (how many days ago the sequence was last played), the estimated difficulty of the sequence (see below), and the sequence score (also see below).
With <F1>, you can obtain an overview of all keyboard shortcuts. The <left> and <right> arrow keys toggle between the two help pages. The <t> key prints this manual in text format to the console. The <m> key opens up the manual online. The <F1> or <escape> keys close the help overlay.
You can quit the trainer with the <q> key.
The Sequence Score
The trainer keeps track of a score for each sequence. For a new sequence, the score starts out at 100 points. The score is multiplied by 0.8 after completing a sequence without any mistakes. When making a wrong move when playing a sequence, the score is increased by 40 points (up to a maximum of 100). You can use the <t> key to take back the score adjustment after making a wrong move (but you should only do this when making the wrong move accidentally). Receiving a hint with the <h> key increases the score by 20 points (40 points when asking for both the starting and the target square, so this is equivalent to making a mistake).
The trainer uses the score to choose the next sequence. Sequences with higher scores have a higher chance to be presented. The probability of playing a particular sequence is computed with \(p_i = s_i^e / \sum s_i^e\), where \(s_i\) is the score of the \(i\)th sequence and \(e\) is the ‘exponent value’. This is set to 2 by default and enhances the probability that sequences with higher scores are more likely to be played. The exponent value can be adjusted with the <^> (or <6>) key. Setting the exponent value to 0 makes all sequences equally likely to be played. Setting it to a large value (e.g., 10) makes it very likely that the sequence with the highest score is played next. The score for the current sequence can be set manually with the <%> key. Setting the score to 0 means that the sequence has a zero probability of being presented.
Using the <M> key, you can trigger a mistake. This is useful if you made the correct move(s) but with a lot of uncertainty and want to increase the chances that you will encounter the sequence again in the future.
After completing a sequence, the current score for the sequence is saved (together with the number of times that the sequence has been played and when it was last played) to the sequence file. This way, your progress in learning the sequence is saved permanently across sessions. Using the <g> key, a progress graph (showing the sequence scores over consecutive rounds) for the current sequence can be shown (if the sequence has been played before). This is useful to check whether progress is being made in learning the sequence. You can zoom into the graph by left-clicking twice (once for the start and once for the end of the interval). This can be repeated to zoom in further. Clicking the right mouse button zooms all the way out. Clicking outside of the graph, right-clicking anywhere when zoomed out, or the <escape> key closes the graph.
Using the <G> key, you can toggle whether the progress graph will be automatically shown at the end of each completed sequence.
With <F11> (or <Ctrl-i>), you can obtain a plot of the average score of all sequences as a function of each completed sequence during the current session. The horizontal dotted line corresponds to the average score at the beginning of the session. This is useful to check whether progress is being made in learning all of the sequences.
Managing and Selecting Sequences
Using the <l> key, you can obtain a list of all sequences, together with their current score, the number of rounds (how times they have been played so far), their age (in days; NA if a sequence has not been played before), the estimated difficulty of the sequence (NA if this cannot be computed yet), and the current play probability (with 0 to 5 asterisks next to it based on the probability). Note that this is shown in the console, so ideally you should place the window with the chess board and the console window next to each other.
In test mode, you can use <Ctrl-d> to delete the current sequence. Note that this is permanent and all progress information about the sequence will be lost. You will receive a prompt to confirm the deletion.
With </> (or <,>), you can select a subset of the sequences in various ways by entering:
a text string (which is applied as a regular expression to the filenames of the sequences),
a sequence number (e.g.,
2to select the 2nd sequence),a sequence number range (e.g.,
2-5to select sequences 2 to 5),something like
score < 50/score > 50to select sequences with a score below / above 50,something like
rounds < 5/rounds > 5to select sequences that have been played less than / more than 5 times,something like
age < 7/age > 7to select sequences that have been played less than / more than 7 days ago,something like
difficulty < 20/difficulty > 20to select sequences with a difficulty below / above 20,something like
mistake < 2/mistake > 2to select sequences where the last mistake was made less than / more than 2 days ago,a FEN to select all sequences that contain a position matching the FEN,
c:followed by a (case insensitive) text string to select all sequences where a comment contains the text string.
The keywords score, rounds, age, difficulty, and mistake can be abbreviated to s, r, a, d, and m (so s > 50, r < 5, a > 7, d > 20, and m < 2 would also work). Other comparators such as >= and <= can also be used (e.g., s <= 50).
When entering a text string, you can refine your search by prefixing the string with either ‘& ’ or ‘| ’, that is, ‘& <text string>’ searches for the intersection of the currently selected sequences and those matching the new text string while ‘| <text string>’ searches for their union.
Just pressing <enter> at the prompt (i.e., not entering any search string) keeps the current selection. Entering * at the prompt selects all sequences. The <*> (or <8>) key also selects all sequences without using </> first. If you only want to search for sequences (without selecting them), you can use the <|> key (instead of </>).
In test mode, sequences are played by default at random based on the score as described above. However, you can toggle into a different sequence selection mode with the <m> key. Selection can be based on:
the score, where sequences with higher scores have a higher play probability (the default),
the score, where the sequence with the highest score is played next,
the number of rounds, where sequences with a lower number of rounds have a higher play probability,
the number of rounds, where the sequence with the lowest number of rounds is played next,
the age, where sequences that were last played longer ago have a higher play probability,
the age, where the sequence that was last played the longest ago is played next,
the difficulty, where more difficult sequences have a higher play probability,
the difficulty, where the sequence with the highest difficulty is played next.
The exponent value affects selection modes 1, 3, 5, and 7. Setting the exponent value to a large value makes mode 1 essentially the same as mode 2 (and similarly, mode 3 like mode 4, mode 5 like mode 6, and mode 7 like mode 8). For modes 2, 4, 6, and 8, if the highest score, lowest number of rounds, highest age, or highest difficulty is the same for multiple sequences, the alphabetically first one is played next. For modes 5 and 6, sequences that have never been played before are given the highest priority. For all modes, sequences whose score was set to 0 are never played.
You can also choose to play sequences sequentially, either ordered alphabetically, ordered by their length (which is given by the number of moves that have to be made by the player), or ordered by their moves. The latter is especially useful when practicing a particular opening and you wants to go through a set of corresponding sequences in the order of the variations.
For the sequential selection modes and for selection mode 6 (i.e., where the oldest sequence is always played next), a message is shown after completing one round of all (selected) sequences (as long as more than one sequence is selected). For the sequential selection modes, one can use the <j> key to jump to a particular sequence number. For selection modes 1 and 2, you can also set a ‘target score’ with the <s> key. Once all (selected) sequences have a score below this target score, a message will be shown.
In test mode, the <r> key repeats the last played sequence. At the end of a sequence, you can also use the middle mouse button to repeat the sequence (before a new sequence is started). With <R>, you can toggle whether a sequence will be automatically repeated if a mistake was made while playing the sequence.
Timed Mode
With the <x> key, you can switch into a timed mode. In this mode, all moves played during a sequence must be completed in a certain amount of time, which is given by the total number of moves that must be played in the sequence times the current setting for ‘time per move’ (which is 5 seconds by default). For example, if 8 moves must be played, then you have \(8 \times 5 = 40\) seconds in total to complete all moves in the sequence (the time taken by the trainer for playing moves is not counted). Not completing the moves within this amount of time is treated like a mistake (i.e., the score is increased by 40 points).
When playing a sequence in this mode, the bar to the right of the board indicates whether the current playing time is above (in green) or below (in red) the amount of time you should have spent on the moves so far (i.e., if every move took exactly the amount of time allowed by the ‘time per move’ setting).
The ‘time per move’ value can be adjusted via <F6>.
Sequence Difficulty
After playing a sequence multiple times, the difficulty of the sequence can be estimated based on past performance. By default, this is computed as the average score increase (ASI) over the plays of the sequence. Using <d>, you can bring up a menu to choose from a variety of different methods for estimating the difficulty, including:
the average score increase over the plays of the sequence (ASI),
the percentage of plays where the score did not improve (PNI),
the number of plays where the score did not improve (NNI),
the percentage of plays with a change in the score trend (PCT),
the average of the scores of the sequence (AVG),
the standard deviation of the scores of the sequence (SD),
the root mean square successive difference (RMSSD),
the decay parameter from an exponential regression model (ERM).
These different calculations methods reflect the difficulty of a sequence in various ways. Sequences with high values for the ASI, PNI, NNI, PCT, SD, and RMSSD tend to show larger fluctuations in their scores over time and are apparently difficult to remember. Sequences with high AVG values are also difficult. Sequences with high ERM values are deviating strongly from the optimal decrease in the score that should happen when never making mistakes while playing a sequence (i.e., \(100\), \(100 \times 0.8 = 80\), \(80 \times 0.8 = 64\), and so on). By default, only the 15 most recent scores are used in the calculation of these statistics. Also, by default the difficulty is only computed when a sequence has been played at least 5 times. These values can also be adjusted via the menu that comes up when pressing the <d> key.
Adding New Sequences
As described above, the trainer comes with a few example sequences to teach you how it can be used, but serious use of the trainer requires that you add your own sequences. With <space>, you can switch into the add mode, where you can enter new sequences. The first thing to decide is whether the player should play with white or black. With the <f> key, the board can be flipped accordingly (the player always plays with the pieces shown at the bottom). Next, you need to decide whether some moves will be automatically played at the beginning of a sequence. If some moves should be played automatically, then simply make these moves on the board. Once you arrive at the position where a player should start making moves, press <z> (note that ‘Show’ at the bottom left then turns from ‘Yes’ to ‘No’). Now continue playing the line as it should be played. If you make a mistake when playing a move, use the <t> key to take the move back. Once the sequence is complete, use the <s> key to save the sequence. You will be prompted for a filename in the console. Once the sequence has been saved, it will automatically become part of the sequences that may be presented in the test mode.
A sequence may also start immediately at the starting position. Here, you will press <z> right at the beginning. Since it is then essentially impossible for a player to know what they should play (since there are many sensible moves one could make from the starting position of a chess game), you will have to instruct the player what they should do. Using the <c> key, you can add a comment to the current move which will be shown to the player (before they have to make the move). For example, you could tell the player to play the Spanish (Ruy Lopez) opening. You should then make the appropriate moves on the board.
Comments can be added to any move using the <c> key. These will be shown before the move is played. This may be useful if one could venture into multiple sensible lines in a given position. You would then have to instruct the player to make a particular move (either by telling the player directly which move to make or giving some appropriate hint, such as the name of a particular line/variation). Comments can also be used to mention variation names or other useful information. To wrap comments across lines, you can use ‘\n’ in the comment text.
If a sequence should commence not at the starting position of a chess game, but later on, you can move the pieces into the desired position and then use the <0> key to make the current position the starting position for a particular sequence. Alternatively, you can use <b> to start a board editor (see below for details).
Occasionally, you may want to construct sequences where the player also has to make the moves of the opposing side (i.e., for the computer). The <Z> key can be used to toggle whether the computer moves will be automatically played or not (when this is toggled off, then this will also be indicated at the bottom left). For example, you could memorize entire games by pressing the <z> and <Z> keys at the very beginning and then making all moves of the game. A comment should then be added before making the first move to provide a reminder which game should be played.
The <e> key can be used to edit the comments for a particular sequence. This way, you can also add a ‘start comment’ and/or an ‘end comment’ to a particular sequence (the former will be shown in an overlay box before the sequence starts, the latter at the top after the last move). The <E> key opens up the data editor on the data frame that contains the moves for the current sequence. This can also be used to add, edit, and remove comments in the comment column or make adjustments to the other columns (but this should only be done if their meaning is clear).
Once a number of moves have been made for the sequence, the <left> and <right> arrow keys can be used to go back or forward one move. With the <1> or <up> arrow keys, you can jump to the first move that needs to be made by the player (i.e., the first move where ‘Show’ is set to ‘No’) or to the very beginning of the sequence if one is already at or before this position in the sequence. The <2> or <down> arrow keys jump to the very end of the sequence. The <3>, <4>, and <5> keys jump to the first quarter, middle, and third quarter of the sequence (when the sequence consists of very few moves, these different positions may not be differentiable). Note that when making a move when not looking at the very end of the sequence, then this deletes all subsequent moves that were already part of the sequence.
With the <?> key, you can search for sequences that start with the same moves that have been entered/played so far (this also works in the test mode). If any matching sequences are found, they will be shown in the console (followed by the next moves that are part of these sequences). A prompt will ask if they should be selected. This is useful for checking what sequences are already available based on some initial moves (and then practicing these sequences) or finding other sequences similar to the one currently being played. Alternatively, with the <'> key, you can search for sequences that include the current position anywhere in the sequence (irrespective of the particular moves that led to the position). The <]> key does the same thing, but only shows the sequences (without selecting them). The <[> key does the same thing, but only shows a frequency table of the next moves in the sequences found. With the <;> key, you can search for sequences that end on the current position. With the <:> key, you can search for sequences where the last-moved piece is on its current square. Note that all of these searches account for whether the board is flipped or not (i.e., only sequences are shown where the player is either moving the white or black pieces).
With <.>, you can select the last saved sequence (if one was saved before in the current session). This is useful for checking a newly created sequence in test mode and/or creating multiple branching lines from the ending position of this sequence. After selecting a single sequence, the <a> key will create a copy of the current sequence, which can then be extended with additional moves and saved as a new sequence. The same also works in test mode when playing a particular sequence. The <A> key does the same thing, but immediately switches to add mode starting at the current position. At the end of a sequence, the right mouse button also switches to add mode.
In add or test mode, you can bookmark a sequence with the <<> key. In add mode, the last saved sequence is bookmarked. In test mode, the currently played sequence is bookmarked. With the <>> key, you can select and manage bookmarks (use <F1> while managing the bookmarks to obtain help). This is useful for creating multiple branching lines from the ending position of certain sequences or to remember sequences that you want to come back to at a later point.
When creating new opening sequences, the trainer tries to recognize the opening played and indicates the ECO code and opening name at the bottom left.
Also, the trainer automatically recognizes move transpositions (i.e., if there are sequences with the same position that were obtained via a different move order or via different moves). If such sequences are found, their names are printed to the console. This check can be toggled on/off with the <T> key.
Also, any moves made are compared against the existing sequences. If there are sequences with the same current position and the move made is not one of the moves that are part of these sequences, then this will be noted at the top. You can toggle this on/off with the <C> key.
Note that sequences are quite personalized, since they involve going into a particular line that one deems most appropriate (and hence wants to remember). Others may disagree and prefer a different line. Therefore, you should create sequences that you want to train yourself on, so you will be able to play them quickly from memory in actual games.
Querying the Lichess Database
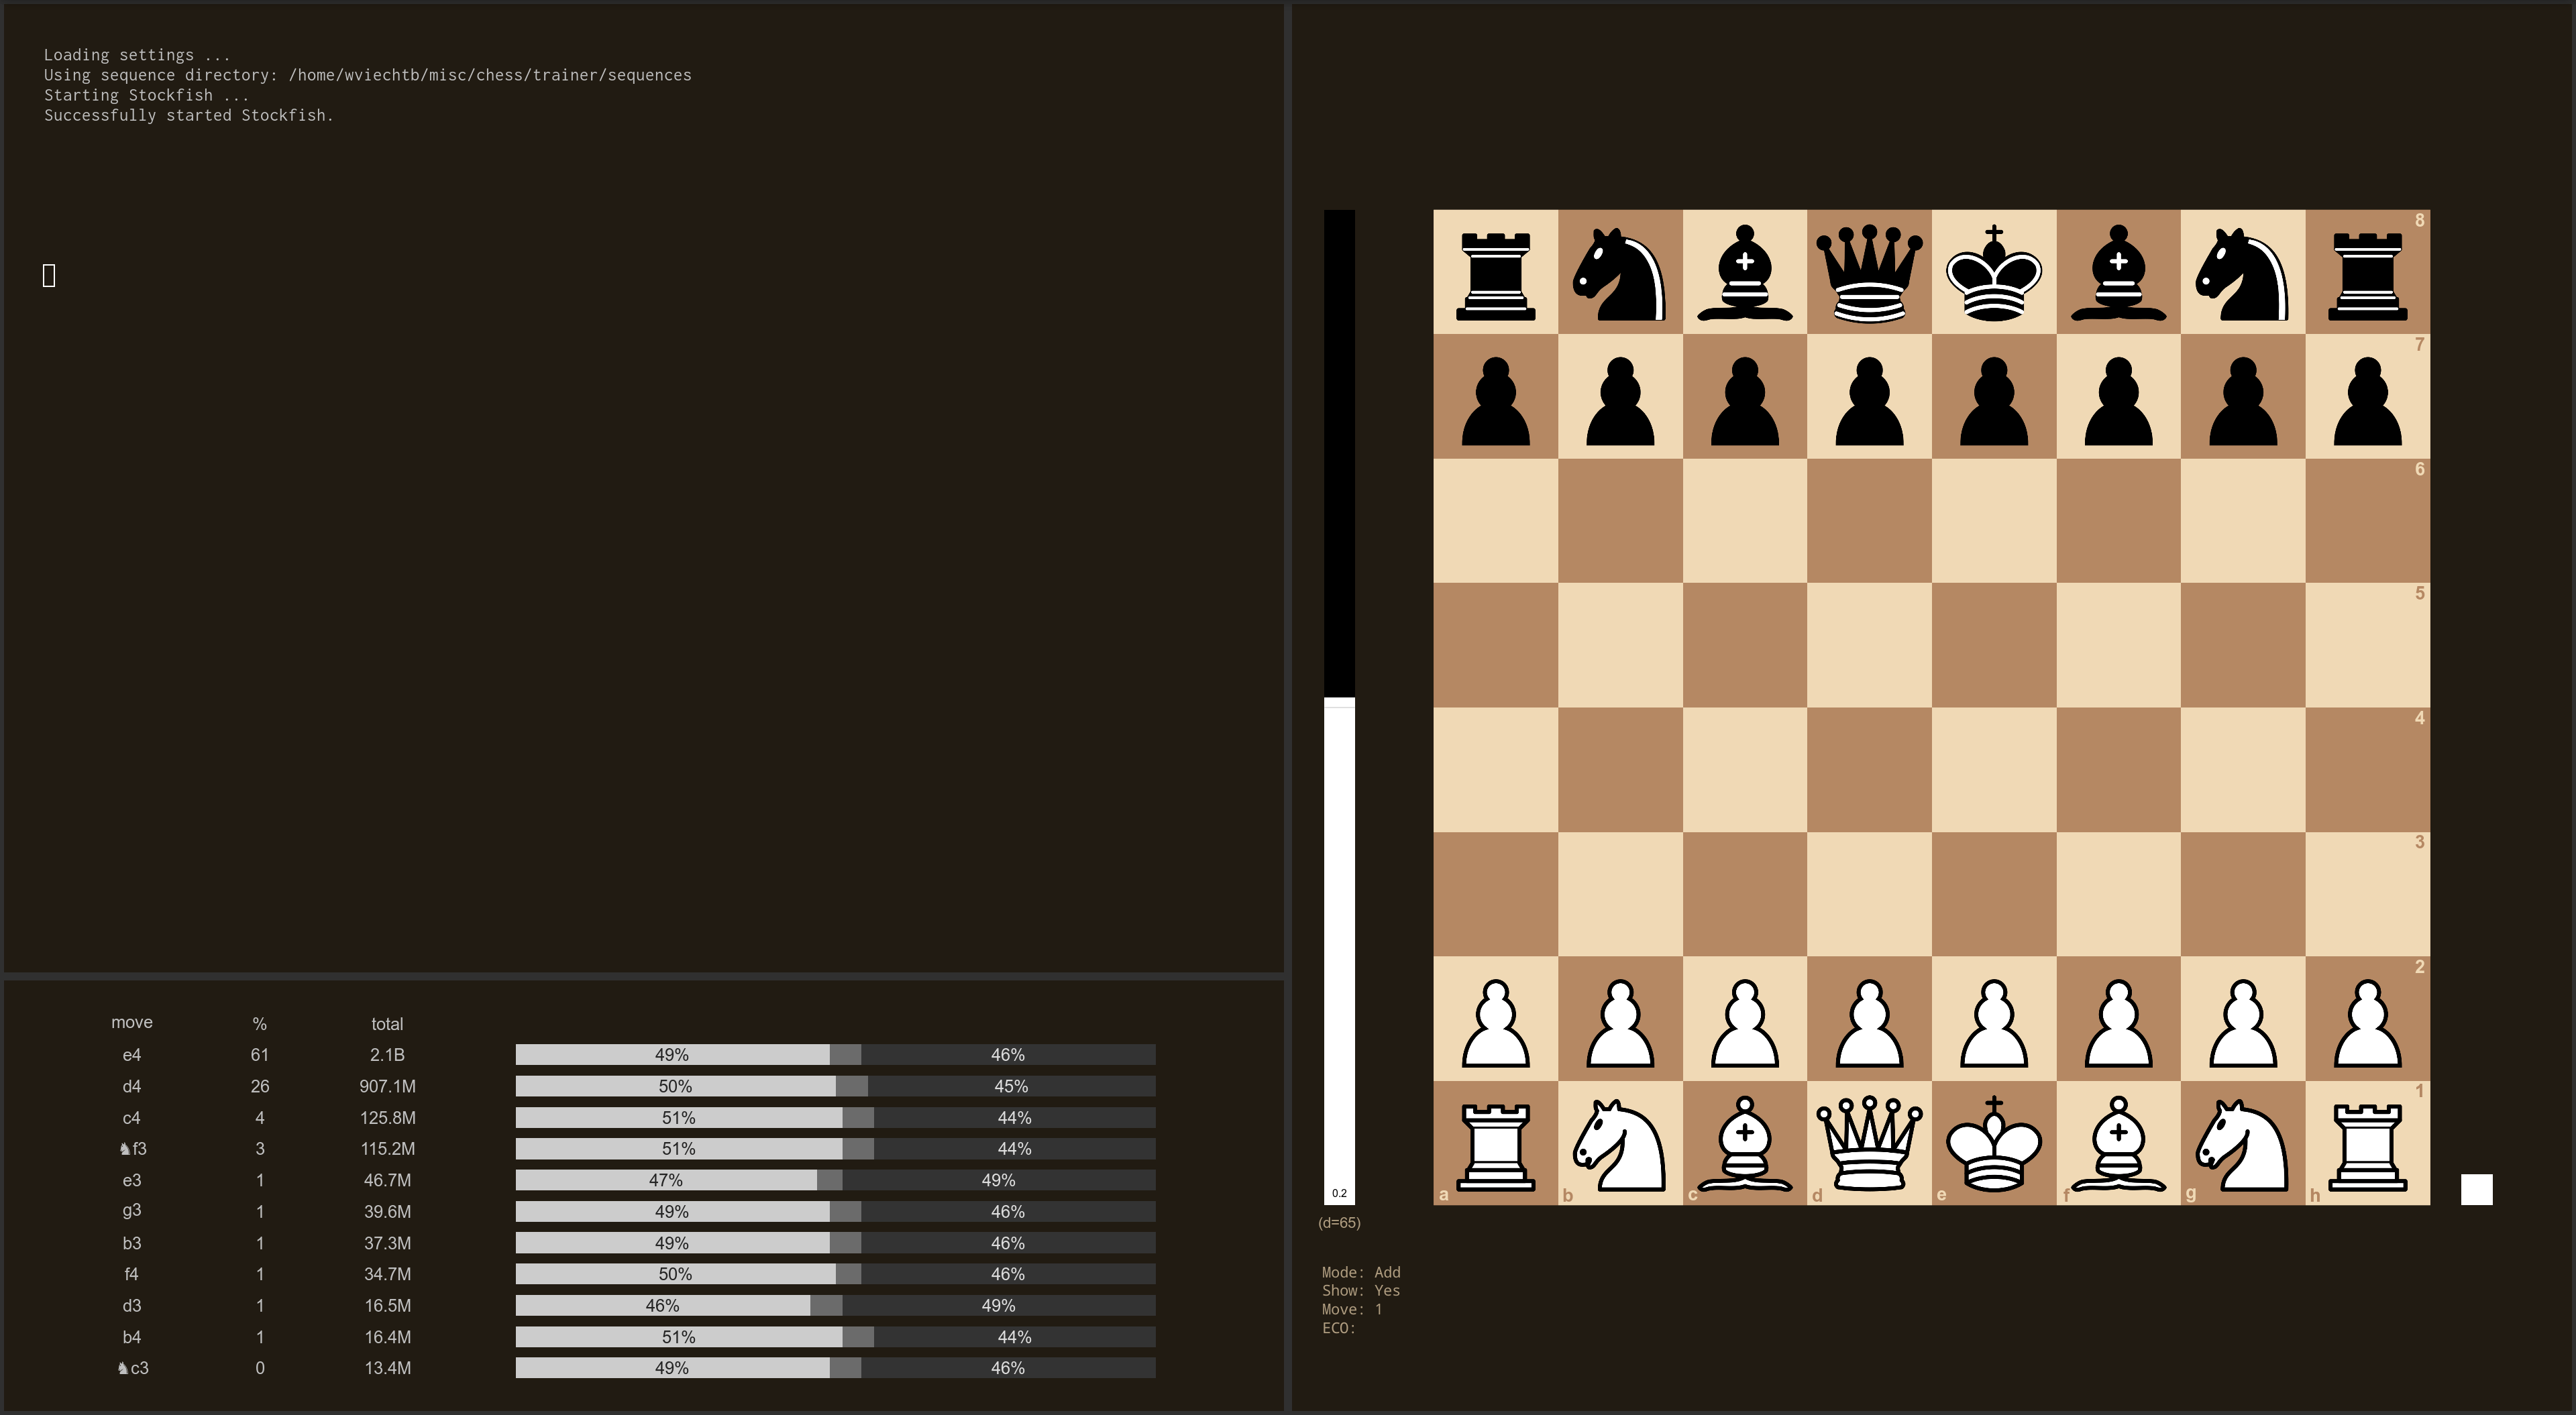
When pressing the <i> key, the trainer queries the Lichess games database (https://database.lichess.org/#standard_games) for the current position. If the position is found, the most frequently played moves are shown in the console, including the percentage of games won by white, the percentage of games drawn, and the percentage of games won by black.
With <F8>, you can adjust some related settings, namely which time controls and which player ratings should be included in the query, whether to query the regular player database or the masters database (for the latter, the time control and rating settings are not relevant), the minimum frequency of moves, the minimum play percentage of the moves, the length of the bars indicating the outcome percentages, how to sort the moves (either by their frequency or by their win percentage), whether to invert the bar (in case you use white text on a dark background in the console), and where to display the moves (either in the console or in a separate plotting window).
When using a separate plotting window, one should arrange the various windows so that the board, console, and window for the Lichess moves are placed side-by-side. A possible arrangement is shown below.
In order to access the Lichess database via its API, you must set an API access token, which requires a Lichess account (on the Lichess website at https://lichess.org, go to Preferences, API access tokens, and then generate a token leaving all toggles off; then enter this token under the <F8> menu by clicking on ‘API Token’).
Also, to reduce the number of times that the Lichess database is queried, the information returned is cached locally (also across sessions) and reused if the database was queried for the same position before. The cache can be cleared via the <F8> menu. Also, cache entries that are older than a certain number of months are automatically removed from the cache. You can also switch off that information about the current position is obtained from the cache, but this implies that the Lichess database is queried even for positions seen before. Note that the API has rate limits, which might be triggered when making too many queries within a short amount of time. If this happens, please wait a minute or so before querying the database again.
The <Y> key can be used to switch on a continuous query mode, where the database is automatically queried after each move. When the continuous query mode is on, an evaluation bar will be shown on the left indicating the outcome percentages for the current position. This bar can be toggled on and off with the <V> key.
Managing and Selecting Sequence Directories
Sequences are saved to and selected from the current sequence directory. You can add, remove, and select sequence directories with <F9> (use <F1> while managing sequence directories to obtain help). Removing a sequence directory simply removes it from being shown in the list of sequence directories (i.e., it does not delete the directory or any sequences therein). Bookmarks are specific to each sequence directory. Also, selecting a sequence directory switches to the sequence selection mode that was active when it was last selected.
The Board Editor
When in add mode, <b> opens up a board editor. Here, you can quickly set up a more advanced position (e.g., for a chess puzzle). With left-click and drag, pieces can be moved around. With right-click and drag, you can copy a piece that is already on the board. A right-click without a drag (or moving a piece to the left or right of the board) deletes a piece. The <f> key flips the board. The <n> key resets the board into the starting position. The <c> key clears the board. The <s> key can be used to select which side plays the first move. The <r> key can be used to enter castling availability in FEN notation (K = white can castle kingside, Q = white can castle queenside, k = black can castle kingside, q = black can castle queenside, - = neither side can castle). With the <e> key, you can enter a FEN to set up the corresponding position. With <F1>, you can receive a help overlay. You can quit the board editor with <q> or <escape>.
Managing and Selecting Players
The trainer can be used by multiple players (i.e., sequence scores and other progress information is player specific). A player can be selected with the <p> key. You can either enter a player number, the name of an existing player, or enter a new player name. Note that player names must be syntactically valid (i.e., they should start with a letter and not contain any spaces).
The current player can be deleted with <Ctrl-r>. Since this deletes all progress information for this player from the sequence files (in the current sequence directory), you will receive a prompt to confirm this.
With <F2>, a leaderboard (based on the lowest average score) and player statistics are shown (i.e., the average score, the standard deviation of the scores, the minimum, first quartile, third quartile, and the maximum score, and the total number of rounds played). The statistics are based on the currently selected sequences (or all sequences in the current sequence directory if no selection has been applied). Also, sequences whose score was manually set to 0 are not included in these statistics.
For each player, the trainer also keeps track of each session including the play time. With <F12> (or <Ctrl-h>), you can obtain a plot of your session history, showing the play time (in minutes) over days (multiple sessions on the same day are collapsed into a single session; sessions shorter than two minutes are not counted). The total play time across all sessions is also shown. With the <down>/<up> arrows (or the middle mouse button), you can toggle to a view of the number of sequences played over days. You can zoom into a particular time frame by left-clicking twice (once for the start and once for the end of the interval). This can be repeated to zoom in further. Clicking the right mouse button zooms all the way out. With the <right>/<left> arrows, you can toggle to a view of the history over weeks and months (these views are only available if the session history spans multiple weeks/months). Again, you can zoom into particular time frames in these views by clicking the left mouse button twice. Clicking outside of the graph, right-clicking anywhere when zoomed out, or <escape> closes the graph.
Position Evaluations via Stockfish
If Stockfish (https://stockfishchess.org) is installed (see the install_stockfish function), it can be used in the background to automatically obtain position evaluations when adding sequences. For this, open up the settings for Stockfish via <F7>, click on ‘Stockfish path’, and enter the path (including the executable) to Stockfish. If this is set correctly, then position evaluations will be automatically computed and added to a sequence. Evaluations are given in centipawns divided by 100, except for forced mates, which are given as \(\pm99.9\). When playing a sequence, these evaluations are then shown as an evaluation bar on the left of the board.
By default, evaluations are based on a search depth of 12 half-moves (the depth is shown below the evaluation bar). Obtaining such an evaluation for a given position should be relatively quick and not add much lag when creating a sequence. In add mode, the <h> key shows the best move according to Stockfish in a given position. The <y> key can be used to switch on a continuous analysis mode where the best move is automatically shown after each move. The <right> key automatically plays the best move in a given position according to the evaluation.
The <H> key will run a deeper analysis (by default based on search depth of 20 half-moves) and show the best move according to Stockfish. Since this may take some time, a progress bar is shown at the top while the analysis is running.
The <L> key does the same thing, but queries Lichess for a cloud evaluation (https://database.lichess.org/#evals). These evaluations are often based on a very deep search and can be obtained quickly since they are precalculated. If the current position cannot be found in the database, then Stockfish is used to run a deeper analysis as a fallback option (or if the depth of the cloud evaluation is lower than the search depth of a deep evaluation).
With <F7>, you can adjust the Stockfish settings, including the calculation depths (for fast and deep evaluations and for the play mode; see below), the number of principal variations that will be evaluated (for fast and deep evaluations), the (maximum) depth of the line(s) shown at the top of the board when asking for the best move (10 half-moves by default), the number of threads that Stockfish can use during its calculations (the default is 1), and the hash size in MB (the default is 256). If the pause after moving pieces in add mode feels too long, lower the search depth for fast evaluations (e.g., to something like 10) for increased responsiveness.
For a given position, the evaluation obtained is actually cached (also across sessions) and reused if the same position is encountered again. This greatly helps to increase the responsiveness of the trainer, especially when adding opening sequences. The cached evaluation is always based on the highest search depth that was used to evaluate a given position. Cache evaluations that are older than a certain number of months are automatically removed from the cache.
In the <F7> menu, you can toggle whether the cache is used when pressing the <H> or <L> key. When the cache is switched off, the evaluation will either be forced to be based on a local evaluation with Stockfish (when pressing <H>) or a cloud evaluation (when pressing <L>).
The <u> key updates the evaluations for all moves in a sequence by recalculating the evaluations with the current setting for a deeper analysis. Depending on the number of moves in the sequence and the search depth for deep evaluations, this can take a bit of time. With the <U> key, all (selected) sequences can be updated in this manner. Note that this can take a very long time.
Play and Analysis Mode
If Stockfish is running, you can switch into play mode at any time with the <\> key. This is for example useful at the end of a sequence, to continue playing further moves against the computer from the end position of a sequence (e.g., to practice holding an advantage gained during an opening sequence). In this mode, the computer chooses by default its move according to a search depth of 8 half-moves, but this can be adjusted via <F7>. Here, you can also set a limit on the play strength of Stockfish, either as a skill level between 0 and 20 or as an approximate Elo value between 1320 and 3190. Note that only one of these two settings can be in effect at the same time.
Using the <g> key in play mode shows a graph of the position evaluations for the moves played so far (this also works in add mode). The y-axis shows the evaluation based on the centipawns (\(cp\)) divided by 100, but pressing the <down>/<up> arrows or the middle mouse button shows the win percentage (computed with \(50 + 50 \times (2 / (1 + \exp(-0.00368208 \times cp)) - 1)\); see here: https://lichess.org/page/accuracy).
Using <t>, you can take back the last move (i.e., the move played by the computer and your own move), so that it is again your move to play.
As when adding sequences, the moves made are compared against the existing sequences. If there are sequences with the same current position and the move made is not one of the moves that are part of these sequences, then this will be noted at the top. You can toggle this on/off with the <C> key.
The <left>, <right>, <up>, and <down> arrows and the <1>, <2>, <3>, <4>, and <5> keys work the same as described earlier (except that <1> always jumps to the start of the game). This automatically takes you into the analysis mode, where you can try out variations and/or force the computer to make a different move from a given position. Before doing so, you can store the current game (i.e., sequence of moves and current position) as the main variation with the <0> key. Using the <9> key, you can jump back to the end of this main variation.
Once in play mode, the <\> key toggles between the analysis and the play mode. On the other hand, <space> takes you back to the mode that was active before the play mode was initially chosen.
Play Against the Lichess Database
Recall that the <Y> key can be used to switch on a continuous query mode, where the Lichess games database is automatically queried after each move. When this mode is on and one switches to play mode, then the moves played by the computer do not come from Stockfish, but are chosen based on the moves found in the Lichess database (with more frequently played moves having a higher chance of being played by the computer). This way, you can practice openings against what actual players tend to play in a given position. The position evaluations from Stockfish are still available in this mode (assuming Stockfish is running), which provides immediate feedback whether your moves are advantageous or not. In addition, the Lichess evaluation bar is also shown, giving additional feedback.
In this mode, you will often eventually run into a position that cannot be found in the Lichess database. In this case, you can start over by pressing the <n> key.
To practice particular openings, you can also make a certain number of moves in add mode, then press the <0> key to make the current position the starting position, and then switch into play mode. In this case, pressing the <n> key restarts the game in the chosen starting position. Pressing the <N> key restarts the game in the
starting position of a chess game.
Other Settings, Options, and Shortcuts
When playing a sequence, the graphical elements shown on the playing board are created by repeatedly drawing on top of the board. Therefore, when resizing the board, all elements are redrawn, which takes a few moments. With <escape>, the board can be redrawn in its current state, after which it can be resized without having to wait for all previous graphical elements to be redrawn.
Clicking the right mouse button on a square adds a circle to the square. Dragging the mouse from one square to another while pressing the right mouse button draws an arrow. Clicking with the left mouse button on a square, <escape>, or making a move removes these visualizations. When adding a sequence, circles and arrows that are drawn are also saved and will be shown when replaying the sequence in test mode. When such annotations are shown as part of a move that is made by the trainer, the sequence will only proceed after a click.
Similarly, with the <!>, <@> (or <">), <#> (or <§>), and <$> keys, you can add (and remove) annotation glyphs (e.g., exclamation and question marks, respectively) to moves. Such annotations are also shown in test mode.
Various other settings can be adjusted while the trainer is running:
With the
<Ctrl-l>key, the language of the trainer can be toggled between English and German (author note: I wrote this trainer in part for my chess playing kids, which is the reason why a German translation is available).When in test mode, the
<z>key toggles on a ‘zen mode’ where the information at the bottom is hidden.With the
<v>key, the evaluation bar can be toggled on/off. This is mode specific (i.e., you can switch off the evaluation bar when in test mode, but still keep it on when in add mode). If evaluations are not available, the bar is not shown irrespective of whether it is toggled on or off. If the evaluation bar is turned off in test mode, it is still shown at the end of each sequence.There is a 0.5 second delay between moves played by the trainer. This can be decreased/increased with the
<->and<=>keys.The trainer waits for a mouse click at the end of a sequence before starting a new sequence. You can toggle this on/off with the
<W>key.With the
<K>key, you can toggle whether the material difference is shown or not.Moves shown (e.g., by Stockfish or when querying the Lichess database) are given in short algebraic notation. With the
<S>key, you can toggle between short and long algebraic notation.Pieces in moves are shown as symbols. With the
<P>key, you can toggle between different piece symbols (i.e., to letters; if the language is not English, then one can also toggle between the English letters for the pieces or the German ones).
The settings are stored across sessions and can be shown with <F3>.
With <F5>, you can adjust the display settings (e.g., colors, text sizes, whether to show board coordinates). With <F6>, you can adjust some miscellaneous settings, namely the score multiplier for completed sequences without mistakes (0.8 by default), the score penalty when making a wrong move (40 by default), the score penalty per hint (20 by default), the time per move for the timed mode (5 seconds by default), the number of next moves to show after searches (5 by default), the idle time (120 seconds by default; time without any inputs longer than this value is not counted towards the play time for the session history), the minimum session time (60 seconds by default; sessions shorter than this are not actually saved in the session history), the number of animation steps for the evaluation bar (5 by default), and a pause adjustment (in case that text shown at the top of the screen disappears too quickly; this seems to be an issue especially under Windows, in which case setting this to something like 0.3 should fix the issue).
With the <o> key, the FEN of the current position is printed to the console and the position is opened on the Lichess website (https://lichess.org) for analysis. With <Ctrl-f>, the FEN is printed to the console and copied to the clipboard (this makes use of the write_clip function from the clipr package). With <Ctrl-c>, the current sequence name is printed and copied to the clipboard in test mode.
With <F10> (or <Ctrl-s>), you can obtain histograms of the scores of the (selected) sequences, how many times they have been played so far (the number of rounds), how long ago they were played, their difficulty, and a scatterplot of the number of times they have been played versus their scores. In the scatterplot, the downward sloping dashed line indicates the best possible performance (i.e., never making a mistake when playing the sequence over and over) and the solid line the actual performance (as estimated based on a regression model; only shown when there are 5 or more points). If a target score value has been set (see above), this value is indicated as horizontal dotted line (and also as a vertical dotted line in the histogram of the scores).
Playing Sounds
The trainer plays various sounds (e.g., when playing moves, when capturing pieces, when making a wrong move, when completing a sequence). This may or may not work depending on your operating system and configuration. See the playsound function for further details.
The sound volume can be decreased/increased with the <_> and <+> keys (note that this does not work with the mpg123 player under Windows; see playsound). Setting the volume to 0 disables the sound. This can also be useful if playing sounds adds too much lag.
Notes for Windows Users
The trainer also runs under Windows, but the RStudioGD graphics device that is used by RStudio does not support event handling (see the ‘Note’ section below). Running windows() before starting the trainer with play() should work. Alternatively, just run R via RGui, which uses the windows plotting device by default (this is actually the recommended way to run the trainer under Windows).
If the graphics look fuzzy under RGui, then this might be related to high DPI scaling (under high resolutions, it is common to scale apps by 150% or 200% so that text and graphical elements are not tiny; see the display settings under Windows). To avoid this issue, go the the properties of RGui, select Compatibility, Change high DPI settings, High DPI scaling override, and select ‘Application’. After restarting RGui, the graphics should look sharper.
The <F10> function key is registered under Windows, but is also the operating system key for activating the menu bar, which is annoying. You can use the <Ctrl-s> keyboard shortcut instead. For some reason, the <F11> and <F12> function keys are not registered at all. You can use <Ctrl-i> and <Ctrl-h> respectively instead.
Occasionally, the graphics window flickers under Windows, especially when making rapid updates to the graphics being shown. The exact cause of this is unknown.
Backing Up Sequences
It is advisable to regularly make a backup of the sequences you have created. The default directory where sequences are stored can be found with the command:
file.path(tools::R_user_dir(package="chesstrainer", which="data"), "sequences")
Cleaning Up
The package creates various files and directories. The cleanup function can be used to clean up files and directories created by the package.
License Info
The chess pieces used in the package were obtained from https://commons.wikimedia.org/wiki/Category:SVG_chess_pieces where they are available under the Creative Commons Attribution-Share Alike 3.0 Unported License.
The sound files used in the package were obtained from https://github.com/lichess-org/lila/tree/master where they are available under the GNU Affero General Public License.
The opening database was obtained from https://github.com/lichess-org/chess-openings where it is available under the CC0 Public Domain Dedication.
Note
The trainer makes extensive use of getGraphicsEvent to capture mouse movements and keyboard inputs. Only some graphics devices support this. If you receive the error message ‘The graphics device does not support event handling’ when starting the trainer, then the current graphics device does not support this kind of interactivity. For example, this will be the case for the RStudioGD graphics device that is used by RStudio. You can then try running x11() before starting the trainer with play().